So I know some of you have read my posts about my bike and how it hasnt been running right (and my quest to fix it). Well the last night around 11 or so I decided I would try a few of the recommendations from the guys here on the forum. I installed my paired valve block off plates which was easy enough which was easy enough. After that I added a shim to the carb and adjusted the AF.
The Water Pump
While I was doing this I noticed some moisture around the two coolant lines on the carb. I pulled the lines off and clipped the ends off to get a fresh connection. When I did this noticed orange chunks in the coolant. I never saw before. So I decided to flush the system.
The flush went pretty well and I think I got all the corrosion gunk out. I think the water wetter I added may have clean up the system and dislodged alot stuff. The problem arose when I went to reassemble. I guess I torqued the drain plug down to much (more on that later), and I sheared it off...
I tried removed the water pump (and spilled oil everywhere because I wasnt thinking from lack of sleep) to try and get the bolt out. I tried filing a flat head in the bit above the surface. That didnt work, and after the horror stories I heard about extractors I didnt want to try that.
The Honda Dealer
So I went to the Honda Dealer (after calling in sick and sleeping all day). This is the first time I have ever been to a Dealer but it helped to see another VTX 1300S pulling out as I walked in. They quoted me $25-$100 to remove the bolt and helicoil if needed.
He told me although they could remove the bolt he would feel better about replacing it because of my mileage vs the difference in price. The water pump retails for $191 dollars and the cheap cycle parts websites sell them for about $140+ shipping which is 5-10 days.
The dealer mechanic told me "Im not supposed to do this but...." and quoted me $150 to have it delivered by friday. He said it would be better to spend the extra $50 and get a new pump. Not only was his price lower and faster than anywhere else but he recomended I get an extractor kit and try it myself since I couldnt do any harm if I was going to replace it anyways. I was really impressed. For one he really cut me a deal for no reason and he kept my best interest in mind even though it meant I might not buy from him.
The Fix
So I got the extractor kit and broke every bit within the hour....
I remembered Woody on here talking about having great results with extractors so I gave him a call. Turns out I had been doing it wrong the whole time. He gave me quick lesson on how to use them and I had it out in about 15 minutes! Apparently I torque bolts down a bit much... Im realizing the whole more is better thing doesnt apply to this bike in many ways... In an attempt to make sure the bolt stays tight I created a full days worth of work.
Thank you Woody for answering at such a late hour and helping me. If it wasnt for your help I would be having to order a new water pump tomorrow.
Back To The Present
So now its 3:30AM and the bike is mostly back together.
I just gotta tighten a few bolts (gently) fill the oil back up. Fill up the cooling system and burp it.
Im curious to see how the shim, coolant flush, and paired valve block off help my previous issues.
Here are some pics of the days events...
Flushing the Cooling System
![Image]()
Trying to Extract Before Woodys Help
![Image]()
Trying to Extract After Woodys Help
![Image]()
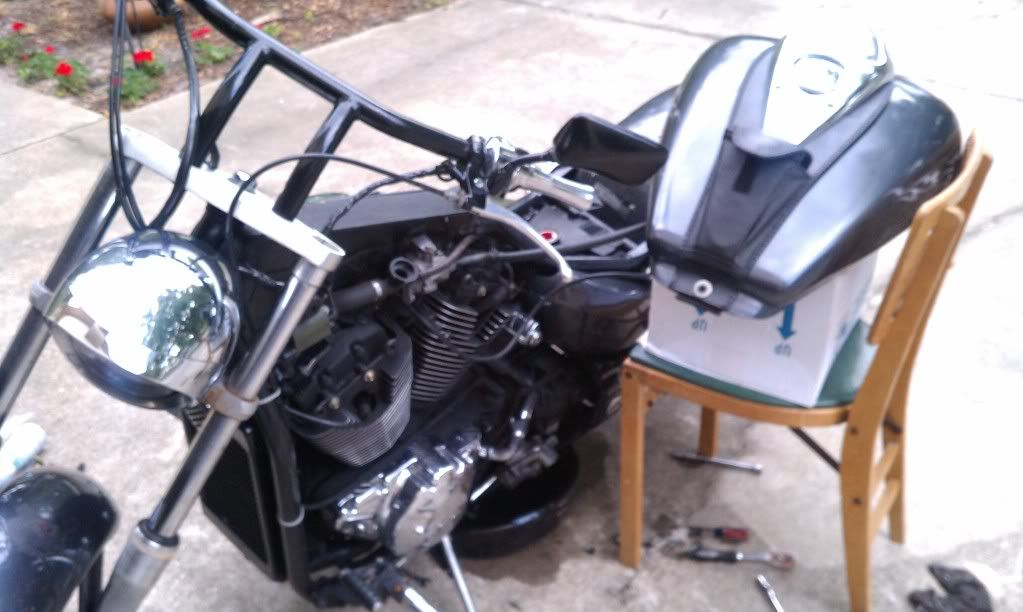
I Missed a Day of Work and Spent the Whole Day (and night) on This...
![Image]()
The Water Pump
While I was doing this I noticed some moisture around the two coolant lines on the carb. I pulled the lines off and clipped the ends off to get a fresh connection. When I did this noticed orange chunks in the coolant. I never saw before. So I decided to flush the system.
The flush went pretty well and I think I got all the corrosion gunk out. I think the water wetter I added may have clean up the system and dislodged alot stuff. The problem arose when I went to reassemble. I guess I torqued the drain plug down to much (more on that later), and I sheared it off...
I tried removed the water pump (and spilled oil everywhere because I wasnt thinking from lack of sleep) to try and get the bolt out. I tried filing a flat head in the bit above the surface. That didnt work, and after the horror stories I heard about extractors I didnt want to try that.
The Honda Dealer
So I went to the Honda Dealer (after calling in sick and sleeping all day). This is the first time I have ever been to a Dealer but it helped to see another VTX 1300S pulling out as I walked in. They quoted me $25-$100 to remove the bolt and helicoil if needed.
He told me although they could remove the bolt he would feel better about replacing it because of my mileage vs the difference in price. The water pump retails for $191 dollars and the cheap cycle parts websites sell them for about $140+ shipping which is 5-10 days.
The dealer mechanic told me "Im not supposed to do this but...." and quoted me $150 to have it delivered by friday. He said it would be better to spend the extra $50 and get a new pump. Not only was his price lower and faster than anywhere else but he recomended I get an extractor kit and try it myself since I couldnt do any harm if I was going to replace it anyways. I was really impressed. For one he really cut me a deal for no reason and he kept my best interest in mind even though it meant I might not buy from him.
The Fix
So I got the extractor kit and broke every bit within the hour....
I remembered Woody on here talking about having great results with extractors so I gave him a call. Turns out I had been doing it wrong the whole time. He gave me quick lesson on how to use them and I had it out in about 15 minutes! Apparently I torque bolts down a bit much... Im realizing the whole more is better thing doesnt apply to this bike in many ways... In an attempt to make sure the bolt stays tight I created a full days worth of work.
Thank you Woody for answering at such a late hour and helping me. If it wasnt for your help I would be having to order a new water pump tomorrow.
Back To The Present
So now its 3:30AM and the bike is mostly back together.
I just gotta tighten a few bolts (gently) fill the oil back up. Fill up the cooling system and burp it.
Im curious to see how the shim, coolant flush, and paired valve block off help my previous issues.
Here are some pics of the days events...
Flushing the Cooling System
Trying to Extract Before Woodys Help

Trying to Extract After Woodys Help

I Missed a Day of Work and Spent the Whole Day (and night) on This...

 atriot: